Description
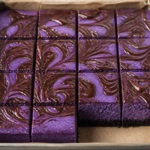
Dark black cocoa Oreo-style crust + vivid purple ube cheesecake filling + a glossy dark-chocolate swirl. Chilled for overnight sliceable bars.
Ingredients
- Oreo-style cookies (for crumbs): 2 cups cookie crumbs (about 200 g) (use black cocoa Oreos or plain Oreos processed into fine crumbs)
- Black cocoa powder: 1/4 cup (20 g)
- Granulated sugar: 2 tbsp (25 g)
- Unsalted butter, melted: 6 tbsp (85 g)
- Cream cheese, softened: 24 oz (680 g)
- Powdered sugar: 1/2 cup (60 g)
- Fine salt: 1/4 tsp (1 g)
- Heavy cream (cold): 2 cups (480 ml)
- Ube halaya: 1 cup (about 280 g) (see notes if using ube extract)
- Ube extract (optional, for extra purple aroma): 1 to 2 tsp (5 to 10 ml)
- Powdered gelatin: 1 tbsp (9 g)
- Cold water (for blooming gelatin): 1/4 cup (60 ml)
- Dark chocolate: 4 oz (113 g), finely chopped
- Coconut oil (or neutral oil) for swirl gloss: 1 tbsp (15 ml)
- Flaky salt (optional): a pinch (about 1/8 tsp)
Instructions
- Line the pan: Line a 9×9-inch (23×23 cm) pan with parchment paper, leaving a little overhang for lifting. Set aside.
- Make the black cocoa crust: In a bowl, stir together cookie crumbs, black cocoa powder, and granulated sugar. Pour in melted butter and mix until the crumbs look like wet sand.
- Press: Tip the crust into the lined pan and press firmly into an even layer using the bottom of a measuring cup. Chill 10–15 minutes while you prepare the filling.
- Bloom gelatin: In a small bowl, sprinkle gelatin over cold water. Let stand 5–10 minutes to thicken.
- Warm gelatin: Microwave in 8–10 second bursts (or warm on the stove) until fully liquid, smooth, and clear. Do not boil. Set aside to cool slightly.
- Beat cheesecake base: In a large bowl, beat softened cream cheese, powdered sugar, and salt until completely smooth, scraping the bowl as needed.
- Whip cream: In a separate bowl, whip cold heavy cream to medium-stiff peaks. (Visual cue: when you lift the whisk, the peaks stand up but the cream still looks creamy, not grainy.)
- Mix ube: Stir ube halaya until smooth. If using, stir in ube extract. The mixture should be pourable and vividly purple.
- Combine filling: With mixer on low or by hand, drizzle in the warm gelatin and mix until fully incorporated. Then fold in the whipped cream. Fold in the ube mixture gently until the filling is an even purple (no streaks).
- Assemble: Spread filling over the chilled crust. Smooth the top with an offset spatula.
- Chill briefly before the swirl: Refrigerate 2–3 hours, just until the top looks set (not liquid-shiny). This helps the swirl sit on top rather than disappear.
- Make the chocolate swirl: Melt chopped dark chocolate with coconut oil. Stir until glossy. Drizzle over the chilled top.
- Swirl: Drag the tip of a small spatula or knife lightly through the drizzle to create swirls. Stop once you like the look.
- Finish chilling: Cover and refrigerate at least 6–8 hours (overnight is best) until firm enough to slice cleanly.
- Slice & serve: Lift from the pan using parchment overhang. Use a sharp knife wiped between cuts. Serve chilled.
Notes
Ube extract vs ube halaya: This recipe is built around ube halaya for structure and body. If you only have ube extract, replace the halaya with a thicker ube paste/jam only if it’s specifically designed for desserts—pure liquid extract won’t provide the same set. For extra purple intensity, increase extract gradually (up to 2 tsp / 10 ml total) and expect a slightly softer texture if you reduce halaya too much.
Doneness cues: After the final chill, the bars should feel firm at the center when you gently press the top with your fingertip (it should spring back slightly, not leave an indentation). The knife should glide with clean edges—no creamy smear.
If your filling looks too thick to spread: Let it sit at cool room temperature for 5–10 minutes, then stir gently and re-spread.