Description
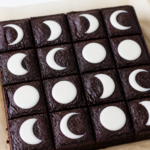
Fudgy 8×8 black cocoa brownies with a thin vanilla glaze and a repeating grid of white moon phases for an elegant Halloween dessert.
Ingredients
- Unsalted butter: 4 oz (113 g), plus more for greasing the pan.
- Black cocoa powder: 1/2 cup (42 g).
- All-purpose flour: 1/2 cup (60 g).
- Granulated sugar: 1 cup (200 g).
- Light brown sugar: 1/2 cup packed (105 g).
- Fine salt: 1/2 tsp (2 g).
- Baking powder: 1/4 tsp (1 g).
- Eggs: 2 large.
- Vanilla extract: 2 tsp (10 ml).
- Chocolate chips (optional for extra fudginess): 1/2 cup (85 g).
- Vanilla glaze:
- Powdered sugar: 1 cup (120 g).
- Vanilla extract: 1 tsp (5 ml).
- Milk (or water): 2 to 3 tbsp (30 to 45 ml), as needed for pipeable thin glaze.
- Fine salt: a tiny pinch (optional, balances sweetness).
Instructions
- Preheat oven to 325°F (165°C). Line an 8×8-inch pan with parchment so it overhangs on two opposite sides. Grease the parchment lightly.
- Melt the butter: In a microwave-safe bowl (or a small saucepan), melt the butter. Whisk in black cocoa powder until smooth.
- Build the brownie batter: Whisk in granulated sugar and brown sugar until the mixture looks glossy and thick. Whisk in eggs one at a time, then mix in vanilla.
- Fold in dry ingredients: Sprinkle flour, salt, and baking powder over the batter. Fold just until no dry streaks remain. If using chocolate chips, fold them in now.
- Spread and bake: Scrape batter into the prepared pan and spread into an even layer. Bake 22 to 28 minutes, until the edges look set and the top is crackly with a slightly soft center.
- Cool completely: Cool in the pan for 30 minutes, then lift out using parchment and cool to room temperature (about 1 hour). Do not glaze warm brownies.
- Cut into a grid: For clean slicing, use a sharp knife and cut into 16 squares (4 rows by 4 columns). Keep the squares in the pan or on a lined tray.
- Make the vanilla glaze: Whisk powdered sugar with vanilla and 2 tbsp (30 ml) milk until smooth. It should be pipeable but thin enough to self-level slightly. If it seems too thick, add milk 1 tsp at a time (5 ml) until it flows.
- Glaze the top surfaces: Spoon a thin amount over each square and gently spread or let it level. The goal is a smooth white base layer so crescents stand out.
- Pipe the moon phases: Fit a piping bag with a small round tip. Pipe a repeating pattern across the squares using only white glaze—start with new moon as a tiny dot or minimal edge, then crescents/quarters, and full moon as a mostly complete circle. Use the toothpick to lightly drag and clean the curved crescent edge.
- Set the glaze: Let the brownies stand until the white glaze looks set (about 20 to 30 minutes). Slice cleanly if needed and serve.
Notes
Doneness is about texture, not just timing: the top should be visibly crackled and the edges set, while the center should feel soft when you gently press the surface with a knuckle (it should spring back slightly). Cooling fully is essential for clean, crisp moon lines—warm brownies melt the glaze.