Description
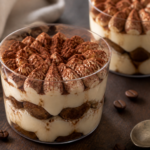
Individual no-bake tiramisu cups with espresso-dipped ladyfinger halves for structure, maple-sweetened mascarpone cream swirled on top, and cocoa dusted right before serving.
Ingredients
Scale
- 2 tbsp (30 ml) strong brewed espresso, plus more as needed for dipping (or 2 tbsp/30 ml instant espresso dissolved in 2 tbsp/30 ml hot water)
- 1 tbsp (15 ml) maple syrup
- 1 tbsp (15 ml) water (to loosen espresso mixture, if needed)
- 7 oz (198 g) ladyfingers, cut into 18–20 small halves (about 1 cup / 140 g, if pre-chopped)
- 8 oz (227 g) mascarpone, softened to spreadable
- 1/3 cup (80 ml) maple syrup
- 1/2 tsp (2 g) vanilla extract
- 1 cup (240 ml) cold heavy cream
- 1/8 tsp (0.5 g) fine salt
- 1/4 cup (30 g) unsweetened cocoa powder, for dusting right before serving
Instructions
- Prep cups and chilled tools. Place 6 small cups (about 4–6 oz / 120–180 ml each) on a tray. Set a piping bag with a large open star tip (or use a zip-top bag with a corner snipped) nearby. Chill the cups in the refrigerator while you prepare the dip and cream.
- Make the espresso dip. In a shallow bowl, whisk together the espresso, 1 tbsp/15 ml maple syrup, and 1 tbsp/15 ml water. You’re aiming for flavor-forward, not watery liquid. If it feels too strong, add 1 tsp (5 ml) more water.
- Quick-dip ladyfingers for structure. Working with one or two halves at a time, dip each ladyfinger piece into the espresso mixture for about 1–2 seconds per side. The surfaces should look evenly coffee-moistened but the piece should still hold its shape.
- Layer the first tiramisu element. Place 2–3 dipped ladyfinger halves into each cup, pressing gently so they fit snugly. They don’t need to fully cover the bottom—small gaps are fine as long as the layer is stable.
- Make the maple mascarpone cream. In a mixing bowl, stir mascarpone, 1/3 cup (80 ml) maple syrup, vanilla, and salt until smooth. In a separate bowl, whip cold heavy cream until soft peaks form (the mixture should mound and hold a brief ridge). Add whipped cream to mascarpone in 2 additions, folding gently until thick and silky. Stop when no streaks remain.
- Pipe (or spoon) the cream. Transfer cream to the piping bag. Pipe a generous swirl onto each cup, building from the center outward. Visual cue: the swirl should keep its shape and not slump.
- Chill to set. Refrigerate the cups promptly, covered, for at least 2 hours. Serve cold.
- Cocoa finish. Just before serving, dust each cup lightly with cocoa powder (use a fine-mesh sieve). Serve immediately for the cleanest “tiramisu” look.
Notes
If your espresso mixture tastes too bitter, add a splash of additional maple syrup—start with 1 tsp (5 ml). If the cream seems too soft after mixing, chill 10–15 minutes and try piping again.