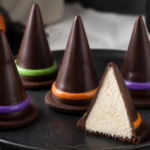
Description
Crisp sugar cones filled with a thick no-egg cheesecake-style cream cheese filling, sealed to chocolate cookie brims, then coated in dark chocolate with a colorful candy-melt (or white-chocolate) band.
Ingredients
- Small wafer sugar cones (for sundaes/ice cream): 10–12 cones (about 3–4 in / 8–10 cm tall each; aim for similar size)
- Round chocolate cookies (store-bought): 10–12 cookies
- Cream cheese (brick-style, softened): 16 oz (453 g), full-fat
- Powdered sugar: 1/2 cup (60 g)
- Sour cream: 1/4 cup (60 g)
- Vanilla extract: 1 tsp (5 mL)
- Instant vanilla pudding mix (dry): 1/4 cup (30 g)
- Fine salt: 1/8 tsp
- Dark chocolate for dipping/coating: 8 oz (226 g), chopped or chips
- Neutral oil (optional, for smoother chocolate): 1 tsp (5 mL)
- White chocolate or candy melts for the band: 1/4 cup (45 g) (candy melts preferred for bold color)
- Colored candy-melt option (if using colored bands): 1–2 tbsp (15–30 g), match your favorite Halloween colors
- Food coloring (only if using white chocolate instead of candy melts): a few drops oil-based candy color
Instructions
- Prepare for assembly: Line a tray that can fit in the fridge with parchment paper. Set out the sugar cones and round chocolate cookies.
- Make the cheesecake filling: In a medium bowl, beat the softened cream cheese with powdered sugar until smooth and thick (about 1 minute). Mix in sour cream, vanilla, and salt until fully combined. Add the instant pudding mix and mix until the filling looks cohesive and slightly thicker than before.
- Chill to firm: Cover the bowl and refrigerate for 30–45 minutes, until the filling holds a gentle peak when you lift a spoon and doesn’t quickly slump.
- Fill the cones: Hold each cone with its pointed tip facing down. Spoon or pipe filling through the wide open end, leaving a 1/4-inch (6 mm) gap below the rim so it will not spill when the hat is inverted.
- Attach the cookie brims: Melt 4 oz (113 g) dark chocolate. Brush a thin ring around the wide rim of each filled cone, press a round cookie against that rim, then turn the assembly over so the pointed hat stands upright on its cookie brim. Refrigerate 10–15 minutes until the bond is firm.
- Coat the cone exterior: Melt the remaining 4 oz (113 g) dark chocolate (stir in the optional 1 tsp (5 mL) neutral oil for a smoother coating). One by one, dip or use a small spoon to coat the outside of each cone with dark chocolate, leaving the filled top area visible.
- Add the band: Melt the white chocolate or candy melts in a microwave-safe bowl in short bursts (or in a small bowl over gentle heat). Spoon a thin band around each cone just above the cookie brim, or drizzle and gently smooth. If using a second color, add small sections or a contrasting stripe while still wet.
- Set the coating: Refrigerate for 15–20 minutes, until the chocolate coating feels firm and the band is set (no tacky feel).
- Optional cut-open presentation: Choose one cone. After the coating is firm, slice it carefully with a sharp serrated knife (a gentle sawing motion helps). Wipe the blade between cuts if needed so the cheesecake filling looks clean and creamy in the cross-section.
- Serve: Serve chilled, best within a few hours of final assembly for maximum cone crunch.
Notes
Egg-free cheesecake-style filling: This recipe uses instant pudding mix to add structure as it chills (no gelatin required). For crisp cones, keep cones and cookies dry, chill between steps, and assemble shortly before serving.