Description
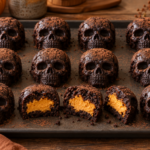
Individual black-cocoa skull brownies filled with a creamy pumpkin-spice center.
Ingredients
Scale
- 3 oz (85 g) full-fat block cream cheese, softened
- 1/4 cup (60 g) plain pumpkin puree
- 2 tbsp (25 g) packed light brown sugar
- 1 tbsp (8 g) all-purpose flour, for the filling
- 1/2 tsp (1 g) pumpkin pie spice
- 1/2 cup (113 g) unsalted butter
- 4 oz (113 g) semisweet chocolate, chopped
- 3/4 cup (150 g) granulated sugar
- 2 large eggs (100 g without shells)
- 1 tsp (5 ml) vanilla extract
- 1/2 cup (63 g) all-purpose flour, for the batter
- 1/4 cup (22 g) unsweetened cocoa powder
- 2 tbsp (12 g) black cocoa powder
- 1/4 tsp (1.5 g) fine salt
- 1 tbsp (6 g) cocoa powder, for dusting
Instructions
- Beat the cream cheese, pumpkin, brown sugar, 1 tbsp (8 g) flour, and pumpkin pie spice until smooth. Divide into 12 small portions on parchment and freeze for 25 minutes.
- Heat the oven to 350°F (175°C). Brush a 12-cavity silicone skull mold lightly with oil and place it on a metal tray.
- Melt the butter and semisweet chocolate together. Cool for 5 minutes, then whisk in the sugar, eggs, and vanilla.
- Fold in 1/2 cup (63 g) flour, both cocoa powders, and salt just until combined.
- Add a shallow layer of batter to each cavity. Place one chilled pumpkin portion in the center and cover it completely with the remaining batter.
- Bake for 17–21 minutes, until the tops are set and a tester inserted away from the filling shows moist crumbs.
- Cool completely in the mold, then release the brownies carefully. Dust lightly with cocoa before serving.
Notes
Do not overfill the detailed mold cavities; leave a small gap at the top so the shapes release cleanly.